Sunday, November 21, 2010

Building the Magnificent Cat Dancing Creations Vendor Booth! Part 5

Plugging along with the booth construction. I thought I would post a few pics of the straw/mud process, as well as where we're at, now that the blog is finally up to date. 
 Here's the back wall with bamboo up several more feet and the wall filled about halfway up the doorway.
 The South end wall, about half done.
 Inside, looking out through the front door and windows. Wall is filled up to the porch roof level. You can see that the upper part is still damp.

Outside view of the front wall. See the booth number?


Looking up at the South end back corner. The triangular space will be a window. Staining is not quite done. Still have some bamboo to finish it out as well.
 The North end wall. Some of the rock stem wall is visible here as well.
 A close-up of some of the joinery of yours truly. Leaves make some of it look a bit strange.

 A shot from inside the rear wall. You'll see Cat stuffing some of it in a bit. The 2X4s serve a dual purpose, or maybe triple. They will be supports to hang art from on the finished wall. They also give points to tie the bamboo too, as well as lateral stabilization for the walls.


 Another close look at the inside of the South end wall. The front of the booth is to the left of the picture.
 A closer look at the wall. Kind of hairy looking, isn't it?


An even closer look at the packed straw/clay mixture.We're even getting a few green sprouts.


Here's the good stuff!


And here's where it starts. As mentioned before, the clay is mixed with water. We use both a garden fork and a paddle till it reaches this consistency, a bit like a not too thick chocolate shake.


Silas row the boat ashore! However, shore never seems to get any closer!


 Loosened straw is mixed in and left to soak for forty-five minutes or so.
There it is. Al dente! Sort of.


 The fork transfers the mix to the wheelbarrow.
Wheel it where it is needed, grab a handful.


Stuff it in the forms. Muddy hands are GOOD for you!


 Keep going till the forms are full. If you look closely you can see the bamboo sitting on the nails that hold the bases in place. A vertical 16d nail serves to hold them in place, while smaller nails are used to attach them to the horizontals and top pieces.
Holes and depressions are inevitable. You can go back and fill them in as you go. The clay also shrinks a bit, it pulls away from the wood above it and to the side, so that needs filling later as well.


 Back to tools. Here are our professional looking mixing barrels.


 These are the buckets we soak extra clay in for mixing. Also professional. Can you tell what they held originally?
 The screen. Made from half inch hardware cloth and 2x4s. At times a finer one would help, quarter inch, perhaps.
Wheelbarrows and, hey, remember that Flintstone roller? The iron barrow at bottom is the really old one. The narrow steel wheel is a problem sometimes, but it is never flat! It also doesn't flex like the plastic barrow.


 Another fun part of the project is the flower spiral garden out front by the ramp.


 A lavender plant tops the spiral, the rest is planted with snapdragons, dianthus, and alyssum. Most of the plants came from the nice folks at Bastrop Organic Gardens, along with good advice on planting. The spiral was planted on the day before the full moon while the moon was in Scorpio. We got Microbial Extract and Castings from Microbial Earth to fertilize it and get it started right. 


There it is! The spiral garden, more specifically used as an herb spiral, was a concept I learned in my Permaculture Design class. 


Work continues!


Book Review

Silent Night, Deadly Night
Silent Night, Deadly Night by Lisa Lach

My rating: 1 of 5 stars


This book is a confusing read. It is apparently self-published and shows it. It would have seriously benefited from being edited. The book badly needs better organization and an index. I am very fond of local historical accounts. I am a past member of the Williamson County Historical Commission, Williamson Co. Genealogical Society, Round Rock and Liberty Hill libraries, and an author. The quoted sources were informative, but the connecting narrative was very hard to follow and suffers from grammar and typo/spelling challenges. I would only suggest reading this book if you want to see the source material, which is plentiful. Don't read it to find a coherent story.
We also are not told anything of the author's background or her purpose for writing the book.
I will finish the book, I will learn from it, but it is not a "Good Read".


View all my reviews

The above is my review of a book I am nearly done reading. The book purports to tell the true story of the lynching and Christmas Day shootout in McDade, Texas in 1883. Guess I should have been clued in by the toy cap pistol on the cover! I'm a writer, I support self-publishing. However, books like this illustrate the drawbacks.


Sunday, November 14, 2010

Building the Magnificent Cat Dancing Creations Vendor Booth! Part 4

After the 2010 Faire season concluded, they kicked everyone out for awhile for cleanup, etc. It was a mixed blessing. The weather was very nice and would have been great for working, but on the other hand, we all needed a break after many weeks of spending weekends at the Faire following many more weeks building. We had to pass up a few chances at free rocks, etc. because we had no place to put it. Once the grounds opened up again, we started back in. We took down the plywood and started hauling in rocks and fill again. Silas got right back onto shoveling, raking, and rolling dirt. We obtained a couple of loads of packing sand from Fenske's, a local dirt supplier near Elgin. He suggested the red sand as being very "packable", which we needed for the packed earth floors. 
Here you can see the new dirt being shoveled onto the floor. The plywood has also been removed and returned to the theater!


Lots and lots of red sand. It actually did pack really well!

More of the new pack sand was added to the porch and ramp as well as re-doing the rock edging. 

Here the floor is filled and ready for final finishing, but that must wait till the walls are done! We're going to be kicking it around for awhile till that is done. At least the extra traffic will pack it down further. Kudos to Silas for spearheading this part of the job especially. He and Michael did the bulk of the floor work you see. The corner you see on the upper left has been filled with dirt and rock over three feet deep to level it out!


At this point I went for a couple of changes. Originally intending wattle and daub walls, I had the idea of going to light straw and clay. I had learned the method in my class for Permaculture Design recently and it seemed a bit less labor intensive, while giving the same visible result. 
The following explanation comes from  http://www.strawbalecentral.com/techniques3.html

Light Straw-Clay (Leichtlehm)
Leichtlehm (literally "light-loam") is a German technique of ramming loose straw coated with a clay slip into forms as an infill for timber frame structures. This technique has been popularly reintroduced to North America by Robert Laporte who teaches natural building courses nationwide. He has been joined recently by Frank Andresen, a builder with extensive natural building experience in his native Germany.

The technique consists of surrounding a frame structure with a thick infill of the straw-clay mixture. The frame is usually fully expressed on the interior of the building to take advantage of the beauty of the timber frame joinery. A lighter frame of wood is built on the eventual outside face of the building as an anchoring system for the straw-clay walls.

Loose straw and a clay slurry are tossed with pitchforks or mixed mechanically, then allowed to age for up to several days in order to allow the straw to absorb the extra moisture and thus create a stickier and more easily tamped mixture. For higher insulation values less clay can be used. Slip forms are set up between the framing members, and the straw clay mixture is tamped by hand in two-foot layers.

Occasional horizontal members spanning between the exterior frame are placed in order to "lock in" the straw-clay mass. Frank Andresen places the ends of these horizontal members at the upper ends of vertical slots in the frame in order to allow for shrinkage of the straw-clay as it dries. Once each layer is complete, the slip form is moved up and the next layer is tamped until the wall is complete. The walls are allowed to dry before final plastering occurs. Any shrinkage is taken up by stuffing more of the mixture into the cracks.
--- end of quote
The material requirements were about the same, but wattle and daub requires both the vertical members I'd already started installing and woven horizontal members to form a mat that the straw-clay mixture would be plastered onto. Light clay and straw is not so old a method, but it was adapted from wattle and daub and looks about the same in the end. 
I made a few of my own adaptations to the style. I retained the verticals to act as reinforcing inside the walls. This was something I hadn't seen done before, but it made sense. I did stop using the saplings, as I found several sources of local bamboo, which is certainly a sustainable material, and tends to be much straighter!
Luckily, we found a local source for the straw. Acceptable straw for use in alternative construction is often hard to find locally. We happened to find someone who had built their own straw bale house and had over thirty bales of good straw left over in storage. We quickly purchased it from him. It is very close to the right amount required for the project. 
Once again, Fenske's came through for us. Here is a load of clay we got from them (separated from some of the red sand by a tarp). 
We shoveled the clay into the buckets shown and soaked it. We added four more of the half barrels and a lot more of the smaller buckets. We've found it helps to soak the clay overnight. Already soaked clay is added from the smaller buckets as the mix in the barrels used up. At end of day, we shovel in more clay and let it soak for the next day. At start of day, we stir the clay and water, adding whatever is needed of each until the consistency is that of heavy paint or a good milkshake before adding straw. As  much loose straw is stirred into the barrel until no more will fit and be covered by clay.

As mentioned in the quote up above, some builders soak the straw in the clay for a day or more. I found that others don't think that makes a difference. We found that soaking for forty-five minutes or so is enough. When the straw begins to become soft and a handful of straw retains the mud on it then it is ready. 

Here is a shot showing a row of mud already set and drying, another form filled on top of it, and vertical bamboo pieces ready to go. We went with twelve inch forms, as anything deeper was hard to pack mud into well using hands. You can see a lot of the straw in the mud here, as well as our stockpile of straw bales under the roof. The poles are getting the bark peeled off before they get mud also.

Here's one of the front walls under a window. A bit closer showing a couple of runs of straw and clay, as well as some of the short forms. You can see the difference between the previous saplings and the newer bamboo.

 Another shot of the front walls and ongoing forming. 


Here is a shot of another new development on the front wall. The framing just visible that somewhat resembles a rainbow will be filled with stained glass ultimately.

Guess what? This blog is nearly up to date now. Next time we'll have current pictures of where we're at and more details. Enjoy!


Building the Magnificent Cat Dancing Creations Vendor Booth! Part 3

Building stem walls and filling the floors continued, actually has hardly stopped even now. Silas continued with that process with Michael's help and Cat, Michael, and I continued to haul scrounged rocks for the process. 


However, we also were getting pressed for time to get at least some of the booth ready for the opening of the Faire in February. Michael and I pushed on to get the roof on. The roof was also needed to protect the new dirt in the floor from rains.


We went ahead with metal roofing for the high roof, as that roof slopes away from the "on stage" area, I felt we could camouflage whatever metal was left showing there and have the benefits of metal.


Here, most of the high metal roofing is on. You can see one of the two translucent fiberglass panels we included to provide light. We plan to conceal the underside of the steel roofing with burlap.


Here's an angle showing the whole high roof on with both skylights.


 Here's another shot with all the roofing on. Also showing some of the bracing and the Flintstone roller.


As the porch roof is totally visible from the Faire grounds, I decided to go with cedar shake shingles on that to be durable, and period.
Here is the porch roof nearly finished. We had already purchased metal roofing for the high roof. I was surprised to find that the square footage cost was roughly the same.


 With Faire opening rapidly approaching we needed to find a way to acceptably vend out of our unfinished space. Theater friends we knew loaned us several theater flats made of plywood which we painted and closed off the front of our building. The square opening here will be one of our front windows, but for 2010 Faire we displayed art in it as you'll see later. Here you can also see the initial uprights for the wattle and daub walls. These were saplings I harvested from trimmings on site. These were various types of tree limbs, reasonably straight, a few are juniper. It wound up looking nice in front of the plywood, didn't it?
Here is the same area in the above picture, as it was when we opened. Some of Cat Dancing's stained glass is in the foreground, the Intarsia wood art is in the window space.


Here is the whole booth as it looked when the faire opened. You can see the rest of the flats. We covered the exposed front of the metal roof with a wood soffit of salvaged wood. The rest of the art is visible here, and you can see Cat standing on the ramp. More saplings were used to make railings around the porch, as there was easily a two foot drop off of the right side! The front doors are again made of salvaged wood and are fixed partly open here. We kept the sales accounting stuff in back. Exposed roofing on the ends was covered here with white fabric for the faire. 
Another shot of the porch with the lovely proprietress, Lady Cat Dancing, in faire garb. The open doors with curtain are visible here, as well as the verticals over the door.


For the sake of balance, here's a shot of the right side of the porch, the rest of the art.


Sir Silas all garbed up in the plaid of his sept.


Sir William of RainCrow. Yours truly. Holding up a post, or vice-versa. Too much mead perhaps? I'm also in a family plaid. The 3M family, I think!


And, of course, Sir Michael. 


All in all, the first year of Sherwood Forest Faire was a huge success! 
We took a couple of months off afterward and then began the work to finish the booth for real!


Next: More floor dirt, and design change! Stay tuned!


Saturday, November 13, 2010

Building the Magnificent Cat Dancing Creations Vendor Booth! Part 2

In Part 1 I told about setting the posts last year in the rain. Fun times! We didn't actually get as muddy as we're getting now, but we'll get to that story later.


With the posts firmly in place, it was necessary to install the timber bracing, both to keep everything plumb and to generally stabilize the growing structure. The most readily available bracing timbers in the lengths we needed were 4x6's in treated pine. All lumber that came in contact with the ground was required to be treated, and that's just a good idea anyway. The cedar posts are just naturally that way, so that wasn't a problem.


Cat picked me up a good chisel at a hardware store, she also got a hand sledge to drive it with, but using a metal hammer for a wood chisel just goes against my raising! I was always a big fan of The Woodwright Shop and Roy Underhill. I needed to make a bunch of mortise and tenon joints for this framing, so I pulled out my trusty wood mallet, shown in the center. That mallet was actually picked up for free at a garage sale long ago. I think it was meant for a gag gavel for someone. The head is some unknown wood, it was wood glued to a large dowel and didn't work well as a tool, so I replaced the handle with a short table leg and attached it correctly. It has worked very well for chiseling, etc. The mallet above it in the picture I actually made at Sherwood from a piece of firewood and a broken sledge handle I had. The head is oak. It works very well, especially for the large joints I was chiseling, but it tires me out quickly to swing it. I could go much longer with my older favorite! The chisel was well made, and it lasted through the framing. Somewhere near the end, someone used that aforementioned metal sledge on it and broke the full tang in the handle. It's still somewhat usable, if you're careful. 


 Here are a couple of shots with most of the diagonal bracing installed. You can also see the basic framing of the porch roof. Once again, that's a white-hatted me up on the ladder whaling away on a mortise and tenon joint.
All the brace joints are mortise and tenoned into the posts, and the cross braces on the end are notched into each other where they pass. At the base of this picture you can also see some of the scrounged urbanite (broken concrete) and stone we had donated. 


Here's a closer shot of the porch framing in progress.


And then we added the main roof framing, giving enough overhang to protect the future clay walls. That means two feet to three feet.
The roof and all major framing is done. Here I am with the traditional evergreen attached to the roof structure to indicate we're "topped out". Not to mention I'm pooped out! Notice the flannel shirt. It was getting cold enough to keep a small camp fire going to warm yourself by periodically.


While the roof framing was going on, Silas started digging the trenches for the stem walls. A trench of about two feet wide and two feet deep was dug between each the exterior posts. The bottom of each trench was tamped down and a foot or so of stone rubble was put down in it. The rubble tends to level the trench, help with drainage and give a stable base for the stem wall.


In order to keep the future walls away from ground water, the stem walls were built up to a minimum of a foot above ground level on the highest corner to nearly three feet above on the lowest corner. In other words, a series of rock walls with level tops. These are all scavenged rocks from various locations around Austin, as well as the broken concrete pieces. The concrete was placed where it wouldn't show. Most of the visible rocks are limestone and are dry stacked. 


 Another angle on our stone work.
Still more stem walls. Believe it or not, the process of adding rocks and building the various portions of wall have continued for most of the last year, along with numerous trips to load and haul rock. 


While the stem walls were being built, fill dirt, more rocks, and sand were being placed to fill the floors up level with the top of those rocks. By open of fair in 2010 we had the porch floor mostly filled, and some of the main floor. The roller near the middle of this picture came in handy. It's another of those antique tools of mine. Once again, it belonged to my great grandfather. We call it "the Flintstone".


In the higher stacks of wall barbed wire was strung between posts at intervals to provide some lateral stability in the stack. It can't be pulled tight enough to effect how the rocks sit on each other. Simple fence staples were driven in the posts and two runs of scavenged barbed wire were strung.


Next installment: Roofing and getting ready for the Faire opening!


Friday, November 12, 2010

Building the Magnificent Cat Dancing Creations Vendor Booth! Part 1

Okay, it's time I owned up to it. For just over a year we've been building our vendor booth out at the new Sherwood Forest Faire on 290 East between Elgin and Paige (Texas). We actually did enough for the opening last year that we were able to vend off of the porch. Now, we are well on our way to finishing construction before Faire opens again on Feb. 19, 2011. Since the basic structure hasn't fallen down yet, I suppose it is safe to blog about the process. Now I get to play catch-up and show you what we've been doing.

My partner, Cat Dancing, does Intarsia wood art, stained glass, and jewelry. She has always wanted a permanent vendor booth at a Renaissance Festival, and when we heard a new one was starting nearby, it seemed to be a golden opportunity. We went out to the site in midsummer of 2009 and picked our site. The new faire is located on a very lovely piece of property that is quite wooded with a mix of tall oaks, juniper, and other trees. The land has gentle slopes in all directions. One can almost look through the trees and imagine being in Sherwood Forest in England. Well, of course, that's the idea!


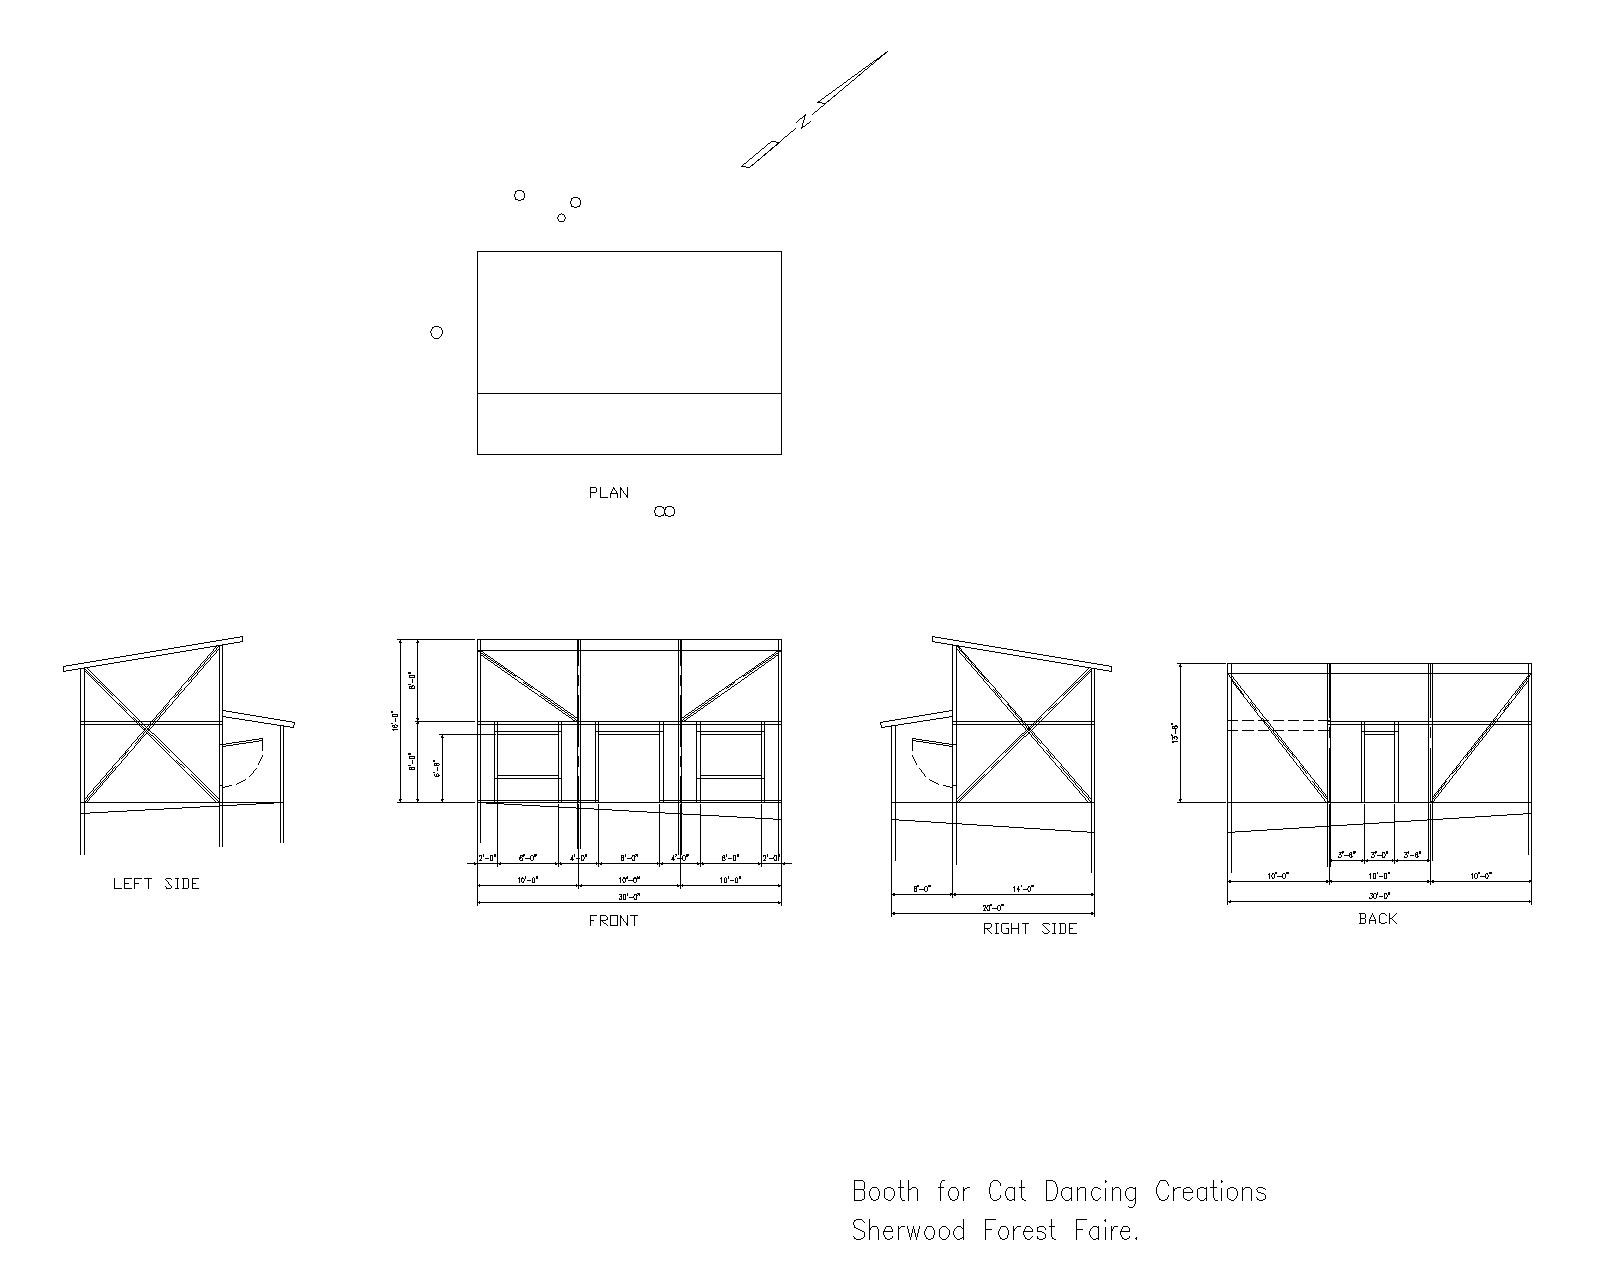
We chose a spot that was not far from the entrance, is partway up the hill, and is on the way to the children's area and restaurants. We chose a booth that was 20' x 30' and were given the booth number of 309. Well, okay, that number changed a couple of times, but it ended up as 309. We hurried home and began to design our building. We wanted something that looked period, of course, and we decided on a design with a high roof and a sleeping loft. The original design looked like this:


 Our original thoughts were to use timber framing and wattle and daub construction. The major vertical members in the plan would be natural cedar posts, the timber framing would be used with timbers exposed. A packed earth floor would also be used.


We got approval from the management for our design, and began to gather material. As much material as possible was to be recycled.


We found large cedar posts from a local supplier, Environmental Mills. The bulk of the rest of the new building materials were purchased from Goodson-Voigt Lumber Company in Giddings. A lot of material was obtained through friends, Craigslist, and Freecycle. On October  2, 2009 we began our work. The main crew consisted of William RainCrow Seward (myself), Silas Bryan, and Michael Bach-Lesak (Cat Dancing's son.)

The first thing to do was to lay out the building with string, and locate the posts. We got the posts and rented an auger to dig the holes. Naturally, we ended up drilling post holes during a couple of the wettest weekends we've ever had. Once the holes were drilled, the three of us set the very long posts with the help of rope, pulleys, and muscle.
 In this picture, I'm the mature gentleman in the white hat on the left. Michael is center, and Silas is on the right. It was quite wet, but the soil is pretty sandy. Nothing like the limestone I grew up around in Seward Junction!
 A couple of the posts are set here and being tamped in. Two additional tools are shown. A green digging bar on the left with a nice tamping head that was given to me, and a solid digging bar that was made from an axle of some sort by my blacksmith great-grandfather. The posts were set four feet deep and tamped in solid.
Most of the poles are in place here.