We've got some blessed rains falling today, so the painting is delayed. I wanted, however, to post the pix of the (almost) finished coop. As soon as it's painted I'll update things. Here's the chicken door and gang plank. To the left you can see the flap door for the nest area. You can also see the recycled windows I put above it. These are crank-out windows I got somewhere. As I stated before, all the materials for this project were recycled, except for the treated 4x4's you can see as runners and main verticals. I also purchased fasteners, hinges, and hasps, although I did at the last minute find some used door hinges to use for part of it. One pair is on the nest flap.

Here's the opposite end showing the back and "people" door for cleaning etc. The recycled nature of material is obvious here in the mismatched paneling. Paint will change that. Some wire net is still to be added to the vent flap opening shown, however, it will be closed at night for quite awhile, as well as the front windows, so that can be put off a bit.
Here's a shot of the interior through the large door. The roosts are visible. The floor is covered with wood mulch here. The light fixture was a recent find at Goodwill. A feed trough is in the center. I'll replace it soon with a self-feeder.
A shot of the nest box with the first egg! I moved the hens to the new coop after dark last night. Looks like they got the idea!
When we last saw the cave I had just finished re-attaching the skin on the outside of the entrance side of the trailer. Now I'm working to re-build the opposite and rear walls. Removing the old paneling and insulation reveals the true story. It actually was not as bad as I expected. Some of the wall studs at the corner must be replaced, as well as the ones on each side of two windows. Pretty obvious in this picture. Again, the edge floor joists need partial replacement as well. The window visible in the upper left corner of the picture is too broken to save.
This is the upper part of the same corner. The horizontals running across the picture are actually dangling down. The ends have rotted. One end has fallen loose and is hanging from the trailer lighting wire.
This is a close up of the same area. You can just see the dangling horizontals at the right edge of the picture. I'm a bit puzzled about how to repair this portion. It has to be curved and support the ribs that will be repaired as well as support both metal edges at the corner. In this shot, as well, the back wall and skin have been totally removed.
Here's the outside view of the missing end wall. The floor joist at the bottom edge must be replaced, as well as some of the window framing, so it was just easier to open it all up.
A close up of the back corner. You can see how the end of the edge joist is rotted away. A portion of the rotted flooring has been removed, much like I did on the first section I repaired earlier.
Here is another angle of that corner. Again, rotted flooring is removed exposing the outside floor joist that will be replaced. There is another of those metal pans over the wheels I have to deal with like before.
The front end of that wheel pan and the front limit of the flooring I removed. The wall is fairly solid in front of this, and the floor is much better beyond this point.
Back to the rear again. The other end of the rotted floor joist. The flooring is not so bad, but that board has got to go.
This is the side wall opposite the entrance. Again, the side supports are rotted away, as well as some of the runners that support the wall metal. This window will be relocated to the back wall and it will be re-framed for a larger window.
More of that window. Parts of the horizontal runners and the short verticals can be re-used.
Here are some of the surplus windows I have on hand. I'll use one of the better and larger ones in the new location mentioned above.
Believe it or not, the end is in sight!
Since the side wall has been open for awhile, one of the landlord's roving hens has made a rather itchy nest in my pile of insulation. I've gathered a half dozen eggs from here in the course of my labors so far! When I close up the sides for good I'll have to find her another space.
The skin is back on, and I'm piecing together the area around the replacement window. You can see it is a bit narrower and taller than the original, which was identical to the one to the right of it. In order to keep the tin pattern the same I chose to re-use the piece cut from the bottom part of the opening and make shingles of it to go up the side. There was just enough.
Here is what that looks like. I suppose it was a toss up whether that is any better than adding a solid piece of flat metal, I had one I could have used. After painting perhaps it won't be too noticeable. However, I could always add fake shutters on the sides if it bothers me later.
The replacement window is installed. Looks pretty good, actually. Fortunately, the panes are enough of a match to visually match the lines of the other window, so it almost looks like it belongs there.
Here is the door re-hung. Should I be honest and admit I had problems with this step? Somehow in the framing process the right side of the door jamb shifted a bit and the hole was slightly too narrow at the bottom to accept the door. I had to cut some things loose, as well as the siding, and shift things back a bit to get the door back in.
On second thought, I won't admit it, don't tell anyone, okay?
All that is left to do with this part in this pic is to add a trim piece over the door and along the bottom to cover the new outside floor joist. Some caulking will also be done before painting.
Remember this? this was the same area when I started. No more eggs in here for a while, anyway.
The next part of the project will be to tackle this bad corner. The dark strip to the right is a strip of pegboard, there is a second one above it. These will be handy, but I'll have to remove them temporarily. All the wall framing is rotten in this corner. It'll be an interesting fix.
The end window to the right will be replaced as well with another of those taller windows. It's broken, and will have to be re-framed anyway, like the previous one was. The side window on the left of this picture is a good one, but some of the framing for it needs work. I'll know when I get the paneling pulled off. I'm hoping I don't have to remove this part of the skin. The end wall is already coming off. No doubt the hen will move back in when I open it up!
Eggs are good!
Back to work! I've already had word that I'm losing one of my storage spaces soon, so the pressure is on!
Okay, we have a hiatus of sorts. Sherwood Forest Faire has ended for this year. We won't be able to continue work on our booth for perhaps a month. The powers that be at Sherwood must spend some time doing their own thing before they let us back in to work on our thing. We're hoping they let us in at least to water our flowers.
So, I'm back on the hunt for employment and in the meantime helping Cat with her art (and my own). Also, since we have good weather and cool mornings, I'm jumping into the renovating of my office trailer.
To re-iterate what I've posted before, when we started building our booth out at Sherwood, there was an old portable office and an even older office trailer out there. One of the owners let me have them both on the condition I would haul off all the stuff that was in them as well. That was actually a good deal, as there was a lot of good building material and other useful stuff stored there. Some of the material has actually been used in our booth, and the portable building has already been converted into a workshop for Cat and I. Previously she'd had a tarp covered portable carport to work under in the back yard, now we have a reasonably weather tight building with room for Cat's intarsia space in one end, stained glass work space in the other, and my own workbench for flutes etc. along one wall.
Notice I didn't say "ample" space, but it is very good for now, and most of the time we can expand out under the trees to do some things if we need to. The landlord was kind enough to allow us space to put it all, on the condition everything goes with us when we move.
It took a bit longer to move the office trailer, almost a year, in fact. A lot of the material from the portable we shifted to the trailer so we could move the portable, and it stayed there. It was relatively dry and secure and out of the way. As I said, some of it was used on the booth anyway, so it was close to where it ended up. We finally cleared the trailer mostly out and I contacted a mover.
It was a bit of a challenge. I had to locate four mobile home tires for it, since the old ones had rotted. The basic metal frame on the trailer was in good shape. Some of the wooden wall framing, however was not. I would estimate a third of the wood framing is rotted out. The floor is mostly good except a few places near the walls. One rear corner has to be re-framed, some work needs to be done on a front corner, and the lower part of one side wall and the attached floor near the door must be replaced. Fortunately all the metal skin is intact, if loose in places, and the windows are mostly good with only a few broken panes.
For moving we wrapped the walls with towing straps and come-alongs to keep it all together. It was a sixteen mile move to our place and we did have to stop and re-adjust things once. A couple of times we wondered if we were going to make it, I admit, but we did. In the following weeks I leveled it and blocked it up.
Now the work starts in earnest.
Here's the beast as it sits. Obviously before I finish it will need some paint as well.
Loose sheet metal near the door. You can see part of the "Highland Mall" printed on the side. This trailer once was a movable showroom for Lowrey Organs. I actually remember seeing it parked outside one of the malls.
The back corner that is rotted. The wood framing will get replaced. As you can see, the metal is intact. If I'm careful it should not be too hard to re-attach after the framing is done.
An inside shot of the corner to re-frame. And, some of the stuff that still needs to be cleared away.
Inside the side wall that needs work.
A plus. Since it was a showroom for electric organs, I have plenty of fluorescent fixtures and wall plugs with a really good breaker box.
Another plus. A working 110 volt window unit a/c. Huzzah!
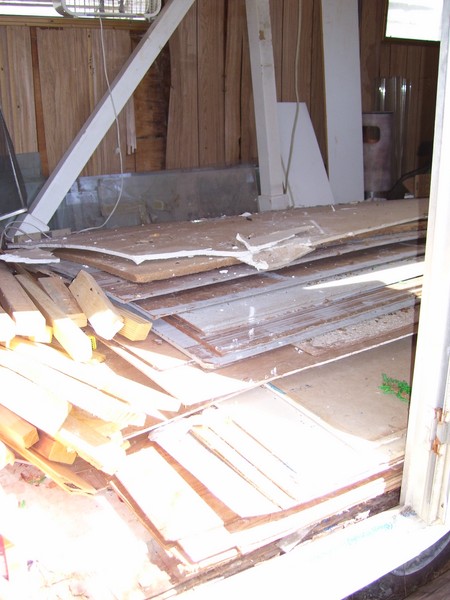
And still another plus. It looks like a mess, and I did have to clear it out, BUT, what you're looking at is more than enough sound lumber and paneling to make the repairs I need to make. I may only have to buy nails and screws. I have my fingers crossed on that score.
I really didn't need extra windows, but I got a bunch. Some of the glass, though can be used to re-glaze the existing windows. Somebody want to build a greenhouse? Besides the aluminum windows there are loose panes of glass galore.
A shot toward the front of the trailer. More stuff. There are actually two small white chest of drawers there with drawers full of acorn shells some critter was filing away. There is also an old wooden desk standing on end that I'm hoping to re-claim for my computer desk.
Well, that's the project. I'm hoping to have enough space I'll be able to retrieve everything from my storage unit and store or use here, plus enough space for bookshelves and computer desk for writing, drafting, and a bit of solitude. Hmm, maybe that's what this will be, my "Fortress of Solitude". Hey, Doc Savage and Superman had theirs, why not me?
We're sometimes a bit cramped in our house, so this will be my space. Actually, a large part of my storage unit is taken up with books, so if I can get my books up on shelves, that will be a large help. I'll keep you posted on my progress. Stay tuned!