We've got sporadic rain showers here today. I'm not complaining, we definitely need it! However, it has somewhat curtailed my work on the trailer remodel. Therefore, I'm investing my time in getting my record here up to date.
In the previous chapter of this, I mentioned a problem with the rounded back corner of the roof and wall.
Remember this?
All of the wood supporting this corner rotted away. Below is how I solved it.
The piece of wall paneling I originally removed from here still had the arch intact. I used it as a template to cut two pieces of the scrap flooring plywood which I then notched to accept the ribs and the window header. You can see my splice for the ribs to the left. It was only one end of each rib that was rotted, re-using them meant I didn't have to take the roofing loose on the other corner as much. I think it worked out well.
Here is the lower outside of that corner. Again, I re-used much of the existing framing with some splicing to remove the rotted parts. There are new vertical studs at each corner as well as the window sides or mullions.
The upper view of the same area. This opening was re-done as the original size, since I am relocating the good side window here. One synchronicity, I ripped scavenged 2x8's down to 2x6 for the new floor joists. The cutoff strip was just right to make new 2x2 studs where needed.
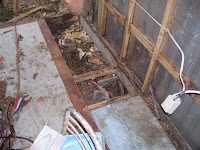
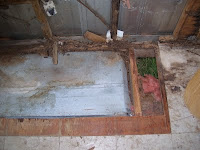
Here's an inside view of the opposite floor corner. I didn't have any more of the salvaged floor decking so I'm using salvaged pine 1x12's to replace the sections of rotted floor wood.
Here is the opposite end of the same board in the previous picture. (Below that pesky round corner.)
And then continuing those boards along the sidewall toward the front. The boards are only butted and screwed to the floor joists. I'll seal the cracks later with silicone caulk. To the left is the new bottom runner to attach the new wall framing on the side wall. Below that is the new portion of the edge joist.
Okay, that's where it stands for now. At least until the intermittent showers stop.
Hooray for rain!
When we last saw the cave I had just finished re-attaching the skin on the outside of the entrance side of the trailer. Now I'm working to re-build the opposite and rear walls. Removing the old paneling and insulation reveals the true story. It actually was not as bad as I expected. Some of the wall studs at the corner must be replaced, as well as the ones on each side of two windows. Pretty obvious in this picture. Again, the edge floor joists need partial replacement as well. The window visible in the upper left corner of the picture is too broken to save.
This is the upper part of the same corner. The horizontals running across the picture are actually dangling down. The ends have rotted. One end has fallen loose and is hanging from the trailer lighting wire.
This is a close up of the same area. You can just see the dangling horizontals at the right edge of the picture. I'm a bit puzzled about how to repair this portion. It has to be curved and support the ribs that will be repaired as well as support both metal edges at the corner. In this shot, as well, the back wall and skin have been totally removed.
Here's the outside view of the missing end wall. The floor joist at the bottom edge must be replaced, as well as some of the window framing, so it was just easier to open it all up.
A close up of the back corner. You can see how the end of the edge joist is rotted away. A portion of the rotted flooring has been removed, much like I did on the first section I repaired earlier.
Here is another angle of that corner. Again, rotted flooring is removed exposing the outside floor joist that will be replaced. There is another of those metal pans over the wheels I have to deal with like before.
The front end of that wheel pan and the front limit of the flooring I removed. The wall is fairly solid in front of this, and the floor is much better beyond this point.
Back to the rear again. The other end of the rotted floor joist. The flooring is not so bad, but that board has got to go.
This is the side wall opposite the entrance. Again, the side supports are rotted away, as well as some of the runners that support the wall metal. This window will be relocated to the back wall and it will be re-framed for a larger window.
More of that window. Parts of the horizontal runners and the short verticals can be re-used.
Here are some of the surplus windows I have on hand. I'll use one of the better and larger ones in the new location mentioned above.
Believe it or not, the end is in sight!
Since the side wall has been open for awhile, one of the landlord's roving hens has made a rather itchy nest in my pile of insulation. I've gathered a half dozen eggs from here in the course of my labors so far! When I close up the sides for good I'll have to find her another space.
The skin is back on, and I'm piecing together the area around the replacement window. You can see it is a bit narrower and taller than the original, which was identical to the one to the right of it. In order to keep the tin pattern the same I chose to re-use the piece cut from the bottom part of the opening and make shingles of it to go up the side. There was just enough.
Here is what that looks like. I suppose it was a toss up whether that is any better than adding a solid piece of flat metal, I had one I could have used. After painting perhaps it won't be too noticeable. However, I could always add fake shutters on the sides if it bothers me later.
The replacement window is installed. Looks pretty good, actually. Fortunately, the panes are enough of a match to visually match the lines of the other window, so it almost looks like it belongs there.
Here is the door re-hung. Should I be honest and admit I had problems with this step? Somehow in the framing process the right side of the door jamb shifted a bit and the hole was slightly too narrow at the bottom to accept the door. I had to cut some things loose, as well as the siding, and shift things back a bit to get the door back in.
On second thought, I won't admit it, don't tell anyone, okay?
All that is left to do with this part in this pic is to add a trim piece over the door and along the bottom to cover the new outside floor joist. Some caulking will also be done before painting.
Remember this? this was the same area when I started. No more eggs in here for a while, anyway.
The next part of the project will be to tackle this bad corner. The dark strip to the right is a strip of pegboard, there is a second one above it. These will be handy, but I'll have to remove them temporarily. All the wall framing is rotten in this corner. It'll be an interesting fix.
The end window to the right will be replaced as well with another of those taller windows. It's broken, and will have to be re-framed anyway, like the previous one was. The side window on the left of this picture is a good one, but some of the framing for it needs work. I'll know when I get the paneling pulled off. I'm hoping I don't have to remove this part of the skin. The end wall is already coming off. No doubt the hen will move back in when I open it up!
Eggs are good!
Back to work! I've already had word that I'm losing one of my storage spaces soon, so the pressure is on!


