In Part 1 I told about setting the posts last year in the rain. Fun times! We didn't actually get as muddy as we're getting now, but we'll get to that story later.
With the posts firmly in place, it was necessary to install the timber bracing, both to keep everything plumb and to generally stabilize the growing structure. The most readily available bracing timbers in the lengths we needed were 4x6's in treated pine. All lumber that came in contact with the ground was required to be treated, and that's just a good idea anyway. The cedar posts are just naturally that way, so that wasn't a problem.
Cat picked me up a good chisel at a hardware store, she also got a hand sledge to drive it with, but using a metal hammer for a wood chisel just goes against my raising! I was always a big fan of The Woodwright Shop and Roy Underhill. I needed to make a bunch of mortise and tenon joints for this framing, so I pulled out my trusty wood mallet, shown in the center. That mallet was actually picked up for free at a garage sale long ago. I think it was meant for a gag gavel for someone. The head is some unknown wood, it was wood glued to a large dowel and didn't work well as a tool, so I replaced the handle with a short table leg and attached it correctly. It has worked very well for chiseling, etc. The mallet above it in the picture I actually made at Sherwood from a piece of firewood and a broken sledge handle I had. The head is oak. It works very well, especially for the large joints I was chiseling, but it tires me out quickly to swing it. I could go much longer with my older favorite! The chisel was well made, and it lasted through the framing. Somewhere near the end, someone used that aforementioned metal sledge on it and broke the full tang in the handle. It's still somewhat usable, if you're careful.
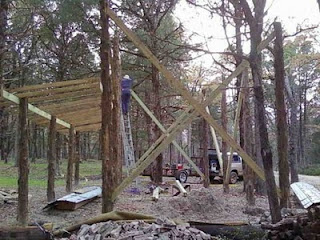
Here are a couple of shots with most of the diagonal bracing installed. You can also see the basic framing of the porch roof. Once again, that's a white-hatted me up on the ladder whaling away on a mortise and tenon joint.
All the brace joints are mortise and tenoned into the posts, and the cross braces on the end are notched into each other where they pass. At the base of this picture you can also see some of the scrounged urbanite (broken concrete) and stone we had donated.
Here's a closer shot of the porch framing in progress.
And then we added the main roof framing, giving enough overhang to protect the future clay walls. That means two feet to three feet.
The roof and all major framing is done. Here I am with the traditional evergreen attached to the roof structure to indicate we're "topped out". Not to mention I'm pooped out! Notice the flannel shirt. It was getting cold enough to keep a small camp fire going to warm yourself by periodically.
While the roof framing was going on, Silas started digging the trenches for the stem walls. A trench of about two feet wide and two feet deep was dug between each the exterior posts. The bottom of each trench was tamped down and a foot or so of stone rubble was put down in it. The rubble tends to level the trench, help with drainage and give a stable base for the stem wall.
In order to keep the future walls away from ground water, the stem walls were built up to a minimum of a foot above ground level on the highest corner to nearly three feet above on the lowest corner. In other words, a series of rock walls with level tops. These are all scavenged rocks from various locations around Austin, as well as the broken concrete pieces. The concrete was placed where it wouldn't show. Most of the visible rocks are limestone and are dry stacked.
Another angle on our stone work.
Still more stem walls. Believe it or not, the process of adding rocks and building the various portions of wall have continued for most of the last year, along with numerous trips to load and haul rock.
While the stem walls were being built, fill dirt, more rocks, and sand were being placed to fill the floors up level with the top of those rocks. By open of fair in 2010 we had the porch floor mostly filled, and some of the main floor. The roller near the middle of this picture came in handy. It's another of those antique tools of mine. Once again, it belonged to my great grandfather. We call it "the Flintstone".
In the higher stacks of wall barbed wire was strung between posts at intervals to provide some lateral stability in the stack. It can't be pulled tight enough to effect how the rocks sit on each other. Simple fence staples were driven in the posts and two runs of scavenged barbed wire were strung.
Next installment: Roofing and getting ready for the Faire opening!


These are the words of a happy builder!
ReplyDelete