A probably bogus quote from either Albert Einstein or Benjamin Franklin says:
"Insanity: doing the same thing over and over again and expecting different results."
Regardless who really said it, it has been quoted many times in twelve step groups and many other places. It does make sense, doesn't it? That's why it strikes a chord.
We're all familiar with it.
We all do that, more or less.
Murphy only knows we have certainly done it every election year since George Washington.
Every time we get promises. "A new broom sweeps clean!" "I feel your pain." "Read my lips: No new taxes." You remember them. They come from both sides of the aisle. Republican, Democrat, Independent. Promises that can't be fulfilled, or at least haven't been.
I'm a bit jaded.
We all should be.
You know, the Native Americans (of which I claim at least a little heritage) learned the lesson about the "American" government long, long ago. They never keep their promises.
Somehow, the rest of us aren't as smart as that. We keep expecting those different results.
My grandparents often tended toward racist, sexist and actually mostly voted Republican. Still, they always claimed "we vote for the man, not the party."
That's a pretty wise statement, actually, if we revise that to "person".
But how do we know about the person?
We can believe all those promises, or we can believe all that dirt that is dredged up about their past. I recently saw a good statement to the effect that "I think I'll run for office. They'll dig up all of my past. I'm trying to piece together my 20's anyway!"
In spite of all the hoopla, whichever party gains whatever office, there is rarely much change.
We can say that some of that is the effect of the checks and balances in place, etc. etc.
If we want to be really cynical about it, we can point to all the various powers behind the elections.
The fix is in.
Both major parties are in on it. Hasn't it been obvious? I mean, really? Regardless of all promises to the contrary, whoever wins, it always degenerates to "Business As Usual."
In my own opinion, the only thing that will ever upset the status quo is for a really large number of us to finally actually vote outside party lines.
Vote for someone who is truly independent. Vote "Green Party", the "Raza Unida Party", the "Independent Party",vote for whatever party you want. There are lots of choices.
Just don't vote either Democrat or Republican unless you really and truly believe in them.
And don't vote for a Rep or Dem who's running Independent because he didn't make the major cut.
I know the arguments.
"Whatever we do, we must cast our vote for a major party so our vote will count against whomever. Don't wast it by voting otherwise!"
Well, isn't that bogus?
It's time to stop buying it!
It's time we, as citizens, take control of the process!
Occupy the election!
Everybody Vote! Vote for real change!
Maybe, just maybe, something will happen. Maybe it won't be the goal of an independent president. Maybe the true process will have to become public so we see what is happening.
It almost did in the infamous stolen election of the "Hanging Chad". Remember that one? It got pretty obvious, but in the end we all went back to sleep.
A glitch in the matrix. Smoothed over. The drones (us) forgot about it.
Remember "Transparent Government?"
It's the only way I can see to achieve it.
Vote the bastards out!
A wide-ranging and eclectic discussion. Raincrows sing about the weather, this one has a lot more on his mind. Writing about writing, and Avatar, and Permaculture, and whatever strikes my fancy in the moment.
Sunday, April 8, 2012
Wednesday, February 15, 2012
Bottle and Food Trees
Both here and in my writing blog Criminal Mischief I've mentioned the Blue Bottle Tree, both the novel in progress, and the actual tree above, which is my own rendition of one. It was for looks only and, alas, it is no more. It is not a wise thing to use a dead peach tree for this, as they tend to rot just below the ground. I removed other dead peach trees on the property by simply pushing them over by hand and then it hit me. DUH! The blue bottle tree is in the same boat! I'm surprised it survived the high winds we've had lately. I removed the bottles and it only took the lightest of pushes to topple the tree. I'm glad I saved the bottles. I mean, the blue wine bottles are nice enough, but there are a few collector type bottles in the bunch. Traditionally the blue bottle trees I've known from childhood were on dead fig trees, which must be more durable at root level. Lately I've seen several manufactured steel pipe trees for the purpose. I don't know. I'll think about it. I have the picture, anyway.
Besides all that we've been planting live trees here at Earth Song Retreat. In the past month we've planted three pecan trees, three peach, two apple, one pear, all in the new orchard along the contours. Plus, along the back yard fence I've planted asparagus, artichoke, raspberry, blackberry, and grapes.
Last weekend the City of Bastrop, with Apache Nurseries, gave away free trees to residents in the area who lost trees last summer to either drought or fire. I was busy at Sherwood Forest Faire (opening weekend), but I broke away long enough to get in the looooooong line for free trees. It took about an hour and a half to finally get up to the site and they had cut back to two trees per household. There was a fair selection, mostly shade trees. Mindful of our food forest plan, I selected two Texas Persimmon trees. I don't really have much experience with these, but I do know they bear fruit and are drought tolerant, so they'll do! I haven't selected a site to plant them yet, but recent rains (YAY!) have the ground a bit muddy for planting anyway. In fact, a good bit of yesterday was spent unsticking the pickup from a muddy patch.
Part of today was spent pruning existing fruit trees.
Two of the three graywater tubs have been set in the ground. We are still looking for the third one. With a bit of drier digging conditions we can begin on the wicking beds. All of this is going on around the efforts out at Sherwood.
Never boring!
Besides all that we've been planting live trees here at Earth Song Retreat. In the past month we've planted three pecan trees, three peach, two apple, one pear, all in the new orchard along the contours. Plus, along the back yard fence I've planted asparagus, artichoke, raspberry, blackberry, and grapes.
Last weekend the City of Bastrop, with Apache Nurseries, gave away free trees to residents in the area who lost trees last summer to either drought or fire. I was busy at Sherwood Forest Faire (opening weekend), but I broke away long enough to get in the looooooong line for free trees. It took about an hour and a half to finally get up to the site and they had cut back to two trees per household. There was a fair selection, mostly shade trees. Mindful of our food forest plan, I selected two Texas Persimmon trees. I don't really have much experience with these, but I do know they bear fruit and are drought tolerant, so they'll do! I haven't selected a site to plant them yet, but recent rains (YAY!) have the ground a bit muddy for planting anyway. In fact, a good bit of yesterday was spent unsticking the pickup from a muddy patch.
Part of today was spent pruning existing fruit trees.
Two of the three graywater tubs have been set in the ground. We are still looking for the third one. With a bit of drier digging conditions we can begin on the wicking beds. All of this is going on around the efforts out at Sherwood.
Never boring!
Labels:
background,
Blue Bottle Tree,
food forest,
garden,
gray water,
permaculture,
trees
Tuesday, January 24, 2012
To Make an Omelet . . .
My partner, Cat Dancing, does most of the cooking here at Earth Song. A wise choice, as she does it very well and makes very healthy meals for us. However, she is away for a couple of weeks in Florida. It therefore has become necessary for me to fall back upon my bachelor cooking skills. (Such as they are.)
My repertoire of meals is somewhat limited. I confess; when I lived alone I relied upon frozen dinners and eating out much of the time. I really never liked cooking for one. On occasion I could prepare a full meal, but it was just easier not to.
I like to bake bread. I can make chili, pinto beans and cornbread, and a few other things on demand. I also learned to do biscuits, gravy, pancakes and the like.
One of the things I like to do for breakfast is omelets.
I used to have one of those hinged omelet pans. Mine even had a recipe printed on one side for easy reference. I liked it a lot, but the Teflon coating on it was getting ragged and I re-purposed it to a currently unspecified non-cooking use. I think Teflon is fine as long as it is intact, however, when it starts coming off the metal it can cause health problems, I've heard. I also like to use cast iron, so I just had to adjust to not being able to easily fold the omelet using the special pan. Trivial, I know.
An omelet is a simple dish to prepare, really. Most of it is variable to personal taste. It lends itself well to inclusion of many different types of ingredients depending on taste and availability. It is a tasty way to "clean out the fridge" of those small amounts of leftovers that are still good, but not enough for a meal. Hardly any measuring is required. Everything is pretty well done to taste.
Here is my own version of an omelet. Before you begin, you should make a quick survey of what you are going to include. First of all you will need several eggs. Six large eggs will make a good omelet for two people. Cheese is also good. Take stock of all the other things you may have in the fridge. Personally, I like refried beans, onions, potatoes and chili.
The omelet in the picture above was cooked today. Eggs, potatoes, onion, spinach, Parmesan cheese.
Time consuming tasks like grating cheese and chopping vegetables should be attended to first if you are planning to use them. In this case, I wasn't.
I sprayed a medium sized cast iron pan with organic Pam non-stick spray. A small amount of oil or butter will also suffice. I warmed the pan on low while I chopped up two small potatoes and a half slice of fresh onion. The potatoes had been washed and the skins left on. After chopping, rinse and drain the potatoes to keep them from sticking together.
Put the onions and potatoes in the warm pan and turn the heat up a bit. Keep an eye on it, don't let it burn. Stir often. At this point I would also be warming any beans, chili, or another filling ingredient that I want to be hot.
While the potatoes and onions are cooking and making lovely smells, break the eggs into a bowl and mix them up well with a fork. Be sure and break up the yolks. I also add a dash or two each of salt, pepper, and seasoned salt to the mix. Pour in a small amount of milk as well and mix it up. I do it by eye, but it usually runs about a quarter cup or so of milk. When the potatoes are cooked and not quite browned distribute them fairly evenly in the pan and add the egg mix on top.
For this morning's omelet, I was using fresh baby spinach and already grated Parmesan for my filler. No pre-warming was required. Chopping was minimal, so I did this while the eggs were cooking. As I said before, virtually anything you like can be added here as filler. I chopped the spinach till I had about a half cup finely chopped.
As the eggs were cooking I kept an eye on them. Cooking slowly is better than too fast. Of course, in a pan eggs will cook from the bottom up. It helps to use a spatula to lift the part that is already solidifying and let the more liquid part run under it. If you keep mixing it in the pan, you simply have scrambled eggs. If you let the mass solidify or "set" as a unit, you have omelet. I watch the top of the mix. When the liquid on top begins to "set" it is time to add the filling.
I added my spinach filling to one half of the top of the eggs, then half of the grated cheese. I then gently lifted the other half with the spatula and folded it over on top of the filling. This leaves you with a pan filled on one side and nearly clean on the other. Be as neat as you can. The more the mix has set, the better this works. (This is where that special omelet pan is nice! You can not only make a neat fold, you can then cook a bit more on each side.)
I added more cheese on top of the mixture and turned off the heat. I use an electric range, so this lets it keep cooking with gradually decreasing heat, melting the cheese but without burning. On a gas range you may wish to turn the flame down and keep cooking until the cheese melts on top. The cast iron pan also helps here as it will retain heat for awhile.
Use the spatula to slice the omelet in two across the center. Scoop half onto your plate and enjoy! It's really tasty to top your omelet with chili at this point. Picante sauce also works well!
Yumm! I had the omelet above for breakfast this morning. (No chili, alas!) While talking about it I just made myself hungry again!
My repertoire of meals is somewhat limited. I confess; when I lived alone I relied upon frozen dinners and eating out much of the time. I really never liked cooking for one. On occasion I could prepare a full meal, but it was just easier not to.
I like to bake bread. I can make chili, pinto beans and cornbread, and a few other things on demand. I also learned to do biscuits, gravy, pancakes and the like.
One of the things I like to do for breakfast is omelets.
I used to have one of those hinged omelet pans. Mine even had a recipe printed on one side for easy reference. I liked it a lot, but the Teflon coating on it was getting ragged and I re-purposed it to a currently unspecified non-cooking use. I think Teflon is fine as long as it is intact, however, when it starts coming off the metal it can cause health problems, I've heard. I also like to use cast iron, so I just had to adjust to not being able to easily fold the omelet using the special pan. Trivial, I know.
An omelet is a simple dish to prepare, really. Most of it is variable to personal taste. It lends itself well to inclusion of many different types of ingredients depending on taste and availability. It is a tasty way to "clean out the fridge" of those small amounts of leftovers that are still good, but not enough for a meal. Hardly any measuring is required. Everything is pretty well done to taste.
Here is my own version of an omelet. Before you begin, you should make a quick survey of what you are going to include. First of all you will need several eggs. Six large eggs will make a good omelet for two people. Cheese is also good. Take stock of all the other things you may have in the fridge. Personally, I like refried beans, onions, potatoes and chili.
The omelet in the picture above was cooked today. Eggs, potatoes, onion, spinach, Parmesan cheese.
Time consuming tasks like grating cheese and chopping vegetables should be attended to first if you are planning to use them. In this case, I wasn't.
I sprayed a medium sized cast iron pan with organic Pam non-stick spray. A small amount of oil or butter will also suffice. I warmed the pan on low while I chopped up two small potatoes and a half slice of fresh onion. The potatoes had been washed and the skins left on. After chopping, rinse and drain the potatoes to keep them from sticking together.
Put the onions and potatoes in the warm pan and turn the heat up a bit. Keep an eye on it, don't let it burn. Stir often. At this point I would also be warming any beans, chili, or another filling ingredient that I want to be hot.
While the potatoes and onions are cooking and making lovely smells, break the eggs into a bowl and mix them up well with a fork. Be sure and break up the yolks. I also add a dash or two each of salt, pepper, and seasoned salt to the mix. Pour in a small amount of milk as well and mix it up. I do it by eye, but it usually runs about a quarter cup or so of milk. When the potatoes are cooked and not quite browned distribute them fairly evenly in the pan and add the egg mix on top.
For this morning's omelet, I was using fresh baby spinach and already grated Parmesan for my filler. No pre-warming was required. Chopping was minimal, so I did this while the eggs were cooking. As I said before, virtually anything you like can be added here as filler. I chopped the spinach till I had about a half cup finely chopped.
As the eggs were cooking I kept an eye on them. Cooking slowly is better than too fast. Of course, in a pan eggs will cook from the bottom up. It helps to use a spatula to lift the part that is already solidifying and let the more liquid part run under it. If you keep mixing it in the pan, you simply have scrambled eggs. If you let the mass solidify or "set" as a unit, you have omelet. I watch the top of the mix. When the liquid on top begins to "set" it is time to add the filling.
I added my spinach filling to one half of the top of the eggs, then half of the grated cheese. I then gently lifted the other half with the spatula and folded it over on top of the filling. This leaves you with a pan filled on one side and nearly clean on the other. Be as neat as you can. The more the mix has set, the better this works. (This is where that special omelet pan is nice! You can not only make a neat fold, you can then cook a bit more on each side.)
I added more cheese on top of the mixture and turned off the heat. I use an electric range, so this lets it keep cooking with gradually decreasing heat, melting the cheese but without burning. On a gas range you may wish to turn the flame down and keep cooking until the cheese melts on top. The cast iron pan also helps here as it will retain heat for awhile.
Use the spatula to slice the omelet in two across the center. Scoop half onto your plate and enjoy! It's really tasty to top your omelet with chili at this point. Picante sauce also works well!
Yumm! I had the omelet above for breakfast this morning. (No chili, alas!) While talking about it I just made myself hungry again!
Chicken Coop Update
We've got some blessed rains falling today, so the painting is delayed. I wanted, however, to post the pix of the (almost) finished coop. As soon as it's painted I'll update things. Here's the chicken door and gang plank. To the left you can see the flap door for the nest area. You can also see the recycled windows I put above it. These are crank-out windows I got somewhere. As I stated before, all the materials for this project were recycled, except for the treated 4x4's you can see as runners and main verticals. I also purchased fasteners, hinges, and hasps, although I did at the last minute find some used door hinges to use for part of it. One pair is on the nest flap.
Here's the opposite end showing the back and "people" door for cleaning etc. The recycled nature of material is obvious here in the mismatched paneling. Paint will change that. Some wire net is still to be added to the vent flap opening shown, however, it will be closed at night for quite awhile, as well as the front windows, so that can be put off a bit.
Here's a shot of the interior through the large door. The roosts are visible. The floor is covered with wood mulch here. The light fixture was a recent find at Goodwill. A feed trough is in the center. I'll replace it soon with a self-feeder.
A shot of the nest box with the first egg! I moved the hens to the new coop after dark last night. Looks like they got the idea!
Here's the opposite end showing the back and "people" door for cleaning etc. The recycled nature of material is obvious here in the mismatched paneling. Paint will change that. Some wire net is still to be added to the vent flap opening shown, however, it will be closed at night for quite awhile, as well as the front windows, so that can be put off a bit.
Here's a shot of the interior through the large door. The roosts are visible. The floor is covered with wood mulch here. The light fixture was a recent find at Goodwill. A feed trough is in the center. I'll replace it soon with a self-feeder.
A shot of the nest box with the first egg! I moved the hens to the new coop after dark last night. Looks like they got the idea!
Labels:
Austin Permaculture Guild,
backyard chickens,
building,
chickens,
construction,
coop,
DIY,
eggs,
poultry,
recycle
Monday, January 23, 2012
Use Those Limbs and Twigs!
(Today I'm re-posting something quite good from Paul Wheaton with his permission. Check out his great stuff at www.permies.com!)
Keep those branches, twigs, rotton logs and Christmas trees!
That stuff is gardener's gold! Organic matter!
Winter is the season for pruning trees. Sometimes taking out dangerous trees. I am mystified when people haul the wood away and in the sping they spend money for mulch. And equally mystified by people that rent an obnoxious, loud, smelly chipper.
here is a quick list of a dozen things that can be done with that wood, keeping it on your property and not having to fool with a chipper.
1. Make your own mulch: A huge branch can be reduced to flat mulch in about two minutes with a pruner. I usually clip at the bends in the tigs and branches. A huge pile of branches and twigs will become about 30 times smaller in 15 minutes.

2. Cover it in soil to make hugelkultur. This is best with the logs (green logs work too) and thick branches. This makes for a richer soil that needs less watering. Some people have built tall raised garden beds with this technique and they have a normal garden that doesn't need water all summer. This is an excellent use for a stump - no need to pull it or grind it, just cover it with soil.
3. In Finland they use small branches and twigs between muddy spots and the house. You can make a muddy spot less muddy, or you can create a place near the house to wipe your feet.
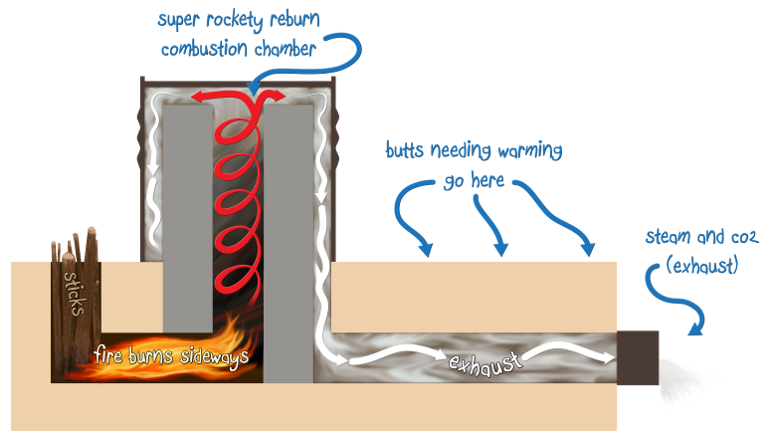
4. Put the wood in a dry place for a while and then use it for firewood. Rocket stove technology can heat a home with 90% less wood than a conventional wood stove. So little, that many homes are heated with nothing but tree trimmings that come out of a small yard.

5. If you keep chickens, nothing makes better deep chicken bedding than pine, fir or spruce boughs.
6. Butterfly/bird/wildlife habitat: Just make a big brushpile. This provides habitat for butterflies to lay eggs, and a variety of beneficial insects and other critters. Most permaculture practitioners keep a brushpile somewhere in their yard because they believe that it reduces pest damage for the rest of their garden.
6.1. Snag or stump for wildlife
7. Criss-crossing branches in a compost pile helps to aerate it.
8. With a bit of jute, it's a snap to make a twig trellis or arbor for your garden. Usually in about ten minutes. And when they get old, you can mulch the branches and the jute together.
9. If you have some wood shop skills, you can make chairs, furniture, name tags, coasters, bird houses, benches, planter box, tool handles, coat racks and so much, much more. And if the wood is living black locust wood, whatever you do with that will last about ten times longer outdoors than cedar without a drop of paint or stain.
10. garden stakes
11. Throwing branches and logs into ponds will usually reduce algae problems and give fish and amphibians a place to hide from predators.
12. marshmallow/hotdog sticks!
A lot of this stuff is effectively sequestering your own carbon! It could be a massive step toward your own personal carbon neutrality.
Keep those branches, twigs, rotton logs and Christmas trees!
That stuff is gardener's gold! Organic matter!
Winter is the season for pruning trees. Sometimes taking out dangerous trees. I am mystified when people haul the wood away and in the sping they spend money for mulch. And equally mystified by people that rent an obnoxious, loud, smelly chipper.
here is a quick list of a dozen things that can be done with that wood, keeping it on your property and not having to fool with a chipper.
1. Make your own mulch: A huge branch can be reduced to flat mulch in about two minutes with a pruner. I usually clip at the bends in the tigs and branches. A huge pile of branches and twigs will become about 30 times smaller in 15 minutes.

2. Cover it in soil to make hugelkultur. This is best with the logs (green logs work too) and thick branches. This makes for a richer soil that needs less watering. Some people have built tall raised garden beds with this technique and they have a normal garden that doesn't need water all summer. This is an excellent use for a stump - no need to pull it or grind it, just cover it with soil.
3. In Finland they use small branches and twigs between muddy spots and the house. You can make a muddy spot less muddy, or you can create a place near the house to wipe your feet.
4. Put the wood in a dry place for a while and then use it for firewood. Rocket stove technology can heat a home with 90% less wood than a conventional wood stove. So little, that many homes are heated with nothing but tree trimmings that come out of a small yard.

5. If you keep chickens, nothing makes better deep chicken bedding than pine, fir or spruce boughs.
6. Butterfly/bird/wildlife habitat: Just make a big brushpile. This provides habitat for butterflies to lay eggs, and a variety of beneficial insects and other critters. Most permaculture practitioners keep a brushpile somewhere in their yard because they believe that it reduces pest damage for the rest of their garden.
6.1. Snag or stump for wildlife
7. Criss-crossing branches in a compost pile helps to aerate it.
8. With a bit of jute, it's a snap to make a twig trellis or arbor for your garden. Usually in about ten minutes. And when they get old, you can mulch the branches and the jute together.
9. If you have some wood shop skills, you can make chairs, furniture, name tags, coasters, bird houses, benches, planter box, tool handles, coat racks and so much, much more. And if the wood is living black locust wood, whatever you do with that will last about ten times longer outdoors than cedar without a drop of paint or stain.
10. garden stakes
11. Throwing branches and logs into ponds will usually reduce algae problems and give fish and amphibians a place to hide from predators.
12. marshmallow/hotdog sticks!
A lot of this stuff is effectively sequestering your own carbon! It could be a massive step toward your own personal carbon neutrality.
Labels:
garden,
hugulkultur,
logs,
permaculture,
recycle,
soil,
Wheaton
Sunday, January 8, 2012
Sis Boom Bah!
Don't forget to check out my writing blog, Criminal Mischief (see button in the sidebar). I am currently posting chapters from my mystery novel in progress "The Azure Shade of the Bluebottle Tree." I need a cheering section to keep working on it!
(I thought M.C. Escher's picture above was appropriate for blogging about my other blog.)
Saturday, January 7, 2012
Subscribe to:
Posts (Atom)