In Part 1 I told about setting the posts last year in the rain. Fun times! We didn't actually get as muddy as we're getting now, but we'll get to that story later.
With the posts firmly in place, it was necessary to install the timber bracing, both to keep everything plumb and to generally stabilize the growing structure. The most readily available bracing timbers in the lengths we needed were 4x6's in treated pine. All lumber that came in contact with the ground was required to be treated, and that's just a good idea anyway. The cedar posts are just naturally that way, so that wasn't a problem.


Here's a closer shot of the porch framing in progress.
And then we added the main roof framing, giving enough overhang to protect the future clay walls. That means two feet to three feet.
The roof and all major framing is done. Here I am with the traditional evergreen attached to the roof structure to indicate we're "topped out". Not to mention I'm pooped out! Notice the flannel shirt. It was getting cold enough to keep a small camp fire going to warm yourself by periodically.
While the roof framing was going on, Silas started digging the trenches for the stem walls. A trench of about two feet wide and two feet deep was dug between each the exterior posts. The bottom of each trench was tamped down and a foot or so of stone rubble was put down in it. The rubble tends to level the trench, help with drainage and give a stable base for the stem wall.
In order to keep the future walls away from ground water, the stem walls were built up to a minimum of a foot above ground level on the highest corner to nearly three feet above on the lowest corner. In other words, a series of rock walls with level tops. These are all scavenged rocks from various locations around Austin, as well as the broken concrete pieces. The concrete was placed where it wouldn't show. Most of the visible rocks are limestone and are dry stacked.
Another angle on our stone work.
Still more stem walls. Believe it or not, the process of adding rocks and building the various portions of wall have continued for most of the last year, along with numerous trips to load and haul rock.
While the stem walls were being built, fill dirt, more rocks, and sand were being placed to fill the floors up level with the top of those rocks. By open of fair in 2010 we had the porch floor mostly filled, and some of the main floor. The roller near the middle of this picture came in handy. It's another of those antique tools of mine. Once again, it belonged to my great grandfather. We call it "the Flintstone".
In the higher stacks of wall barbed wire was strung between posts at intervals to provide some lateral stability in the stack. It can't be pulled tight enough to effect how the rocks sit on each other. Simple fence staples were driven in the posts and two runs of scavenged barbed wire were strung.
Next installment: Roofing and getting ready for the Faire opening!
Okay, it's time I owned up to it. For just over a year we've been building our vendor booth out at the new Sherwood Forest Faire on 290 East between Elgin and Paige (Texas). We actually did enough for the opening last year that we were able to vend off of the porch. Now, we are well on our way to finishing construction before Faire opens again on Feb. 19, 2011. Since the basic structure hasn't fallen down yet, I suppose it is safe to blog about the process. Now I get to play catch-up and show you what we've been doing.
My partner, Cat Dancing, does Intarsia wood art, stained glass, and jewelry. She has always wanted a permanent vendor booth at a Renaissance Festival, and when we heard a new one was starting nearby, it seemed to be a golden opportunity. We went out to the site in midsummer of 2009 and picked our site. The new faire is located on a very lovely piece of property that is quite wooded with a mix of tall oaks, juniper, and other trees. The land has gentle slopes in all directions. One can almost look through the trees and imagine being in Sherwood Forest in England. Well, of course, that's the idea!
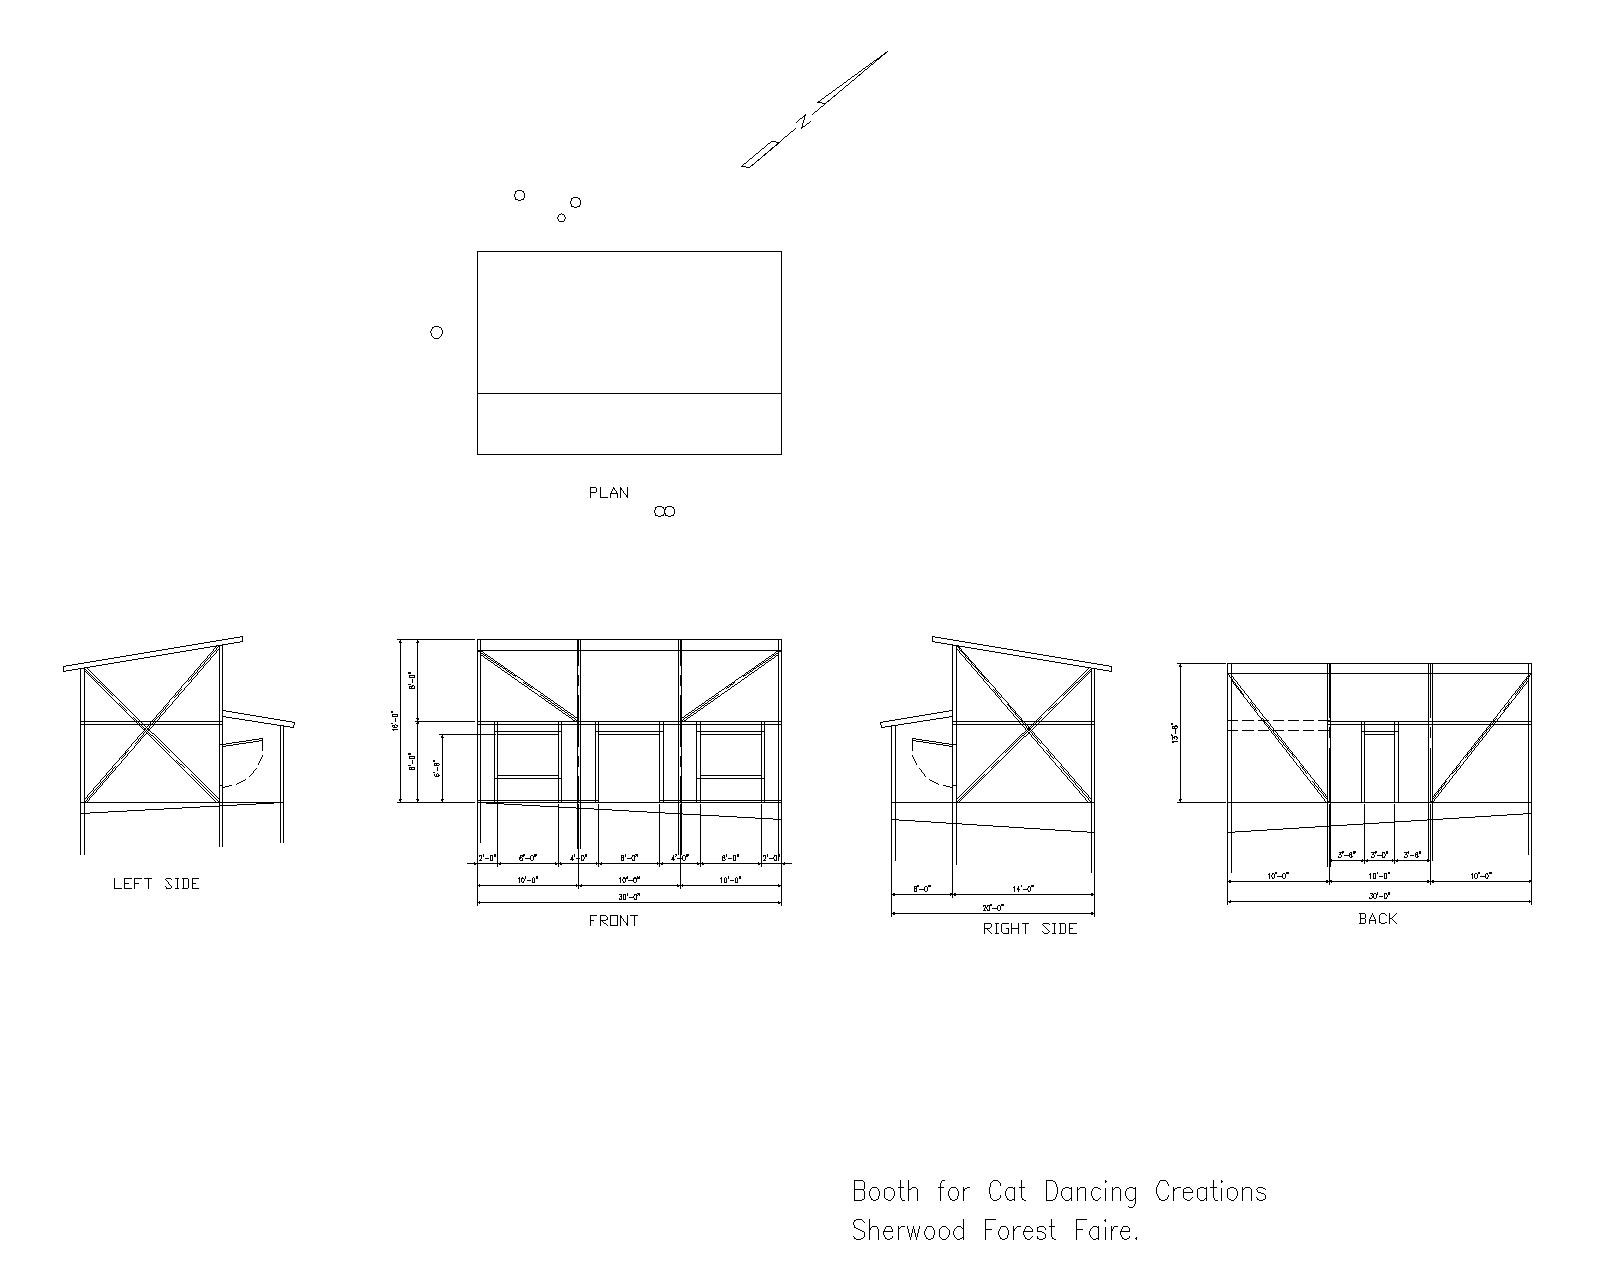
We chose a spot that was not far from the entrance, is partway up the hill, and is on the way to the children's area and restaurants. We chose a booth that was 20' x 30' and were given the booth number of 309. Well, okay, that number changed a couple of times, but it ended up as 309. We hurried home and began to design our building. We wanted something that looked period, of course, and we decided on a design with a high roof and a sleeping loft. The original design looked like this:
Our original thoughts were to use timber framing and wattle and daub construction. The major vertical members in the plan would be natural cedar posts, the timber framing would be used with timbers exposed. A packed earth floor would also be used.
We got approval from the management for our design, and began to gather material. As much material as possible was to be recycled.
We found large cedar posts from a local supplier, Environmental Mills. The bulk of the rest of the new building materials were purchased from Goodson-Voigt Lumber Company in Giddings. A lot of material was obtained through friends, Craigslist, and Freecycle. On October 2, 2009 we began our work. The main crew consisted of William RainCrow Seward (myself), Silas Bryan, and Michael Bach-Lesak (Cat Dancing's son.)
The first thing to do was to lay out the building with string, and locate the posts. We got the posts and rented an auger to dig the holes. Naturally, we ended up drilling post holes during a couple of the wettest weekends we've ever had. Once the holes were drilled, the three of us set the very long posts with the help of rope, pulleys, and muscle.
In this picture, I'm the mature gentleman in the white hat on the left. Michael is center, and Silas is on the right. It was quite wet, but the soil is pretty sandy. Nothing like the limestone I grew up around in Seward Junction!
A couple of the posts are set here and being tamped in. Two additional tools are shown. A green digging bar on the left with a nice tamping head that was given to me, and a solid digging bar that was made from an axle of some sort by my blacksmith great-grandfather. The posts were set four feet deep and tamped in solid.
Most of the poles are in place here.